Analyzing Suspicious CobaltStrike Traffic
CobaltStrike is a Red Teaming platform which we use in internal infrastructure engagements in order to collaboratively discover systems, exploit vulnerabilities, and deploy penetration testing tools. It consists of a „Command and Control“ (CoC) or Team Server which we can log-on to and „Beacons“ spawned on the targets which communicate with the Team Server through covert channels. This eases collaborative penetration testing and red teaming a great deal. However, due to the nature of CoC servers, the CobaltStrike needs to be somewhat publicly accessible. Naturally, we want to limit access to this server. To this purpose RedWarden was designed by Mariusz Banach and deployed on our infrastructure in order to fend off access by systems other than ours.
The Issue
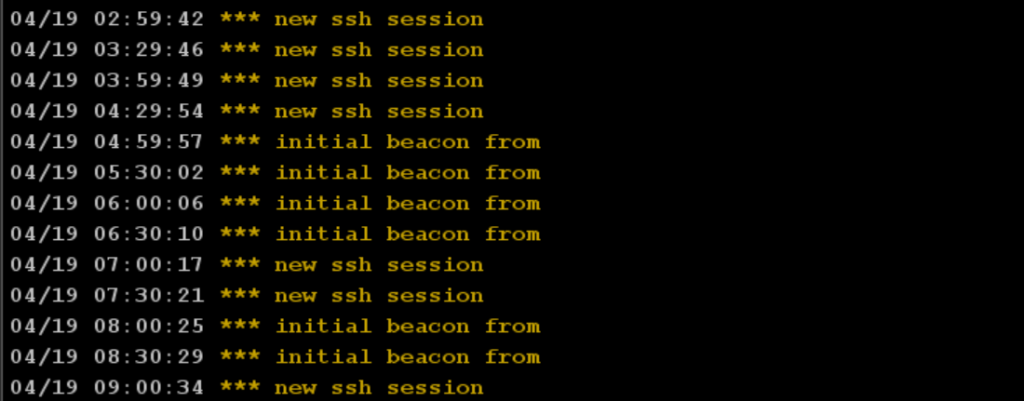
When checking CobaltStrike logs we noticed suspicious Beacon registrations from an IP that wasn’t on of our targets (123.45.67.89):
As a first measure we simply tried blocking the given IP from our RedWarden proxy through firewalling:
# iptables -A INPUT -s 123.45.67.89 -j DROP
# iptables -L -n
Chain INPUT (policy ACCEPT)
target      prot opt source         destination
DROP        all  --  123.45.67.89     0.0.0.0/0

...
The connections did continue however.
In hindsight it should’ve been clear that the IP in the CobaltStrike log couldn’t be the (original) connections‘ IP since RedWarden is used as a proxy for outside access. In other words, if CobaltStrike showed the connection’s IP it would’ve been always the one of RedWarden. Since this isn’t the case, we can conclude that the IP information CobaltStrike gives in the log comes from somewhere else.
To give a bit more reference, the classic setup for a combined RedWarden/CobaltStrike instance is to
- have CobaltStrike only accessible through an internal network
- Pentesters can access said network via VPN
- Beacons connect to a publicly available RedWarden instance and
- RedWarden serves as a gateway between the internal and external network,
forwarding external requests to the internal CobaltStrike.
In order to correlate IPs accessing the RedWarden with IPs accessing CobaltStrike we initially used timestamps. This would let us identify requests that passed RedWarden and triggered an immediate beacon registration in CobaltStrike a second after.
Problem Solved! However, we used this opportunity to dig „deeper“ into which IP address was shown in the CobaltStrike log and where they come from. This required a bit of research, although mostly none original since the single steps described here are mostly covered somewhere already.
Capturing RedWarden Traffic
With eth0 being the interface exposed to the outside world, we could use
tcpdump -i eth0 -w redwarden.pcapto record captured traffic. However, the beacon used HTTPS to channel communication. As yours truly is not yet able to efficiently simulate a quantum computer speedy enough to crack TLS on-the-fly and decode it, we needed to go with the boring route and decrypt using the actual keys. Being one part of the connection endpoints we have those keys available. However, being good citizens, our setup is modern enough that simply passing Wireshark our private key for the TLS/HTTPS certificate won’t work:
The RSA private key file can only be used in the following circumstances:
https://wiki.wireshark.org/TLS#tls-decryption
- The cipher suite selected by the server is not using (EC)DHE.
- The protocol version is SSLv3, (D)TLS 1.0-1.2. It does not work with
TLS 1.3.- The private key matches the server certificate. It does not work with the
client certificate, nor the Certificate Authority (CA) certificate.- The session has not been resumed. The handshake must include the
ClientKeyExchange handshake message.
This is due to forward secrecy: The actual keys used for encrypting the traffic are
ephemeral and purged after a transaction.
Instead we need to ask OpenSSL to dump the ephemeral keys and feed those to
Wireshark as well.
This is due to forward secrecy: The actual keys used for encrypting the traffic are ephemeral and purged after a transaction.
Instead we need to ask OpenSSL to dump the ephemeral keys and feed those to Wireshark as well.
Recording TLS Ephemeral Keys
Wireshark supports reading an SSLKEYLOGFILE. RedWarden uses OpenSSL’s Python bindings through create_ssl_context:
def create_ssl_context():
    ssl_ctx  = ssl.create_default_context(ssl.Purpose.CLIENT_AUTH)
    ssl_ctx.load_cert_chain(options['cacert'], options['cakey'])
The documentation for this function tells us that indeed OpenSSL’s environment variable is used:
When
https://docs.python.org/3/library/ssl.html#ssl.create_default_contextkeylog_filenameis supported and the environment variableSSLKEYLOGFILEis set,create_default_context()enables key logging.
So we simply restart RedWarden:
$ export SSLKEYLOGFILE=~/redwarden.keys
$ python ./RedWarden.py -c config.yaml
and go to work.
Importing Keys into Wireshark
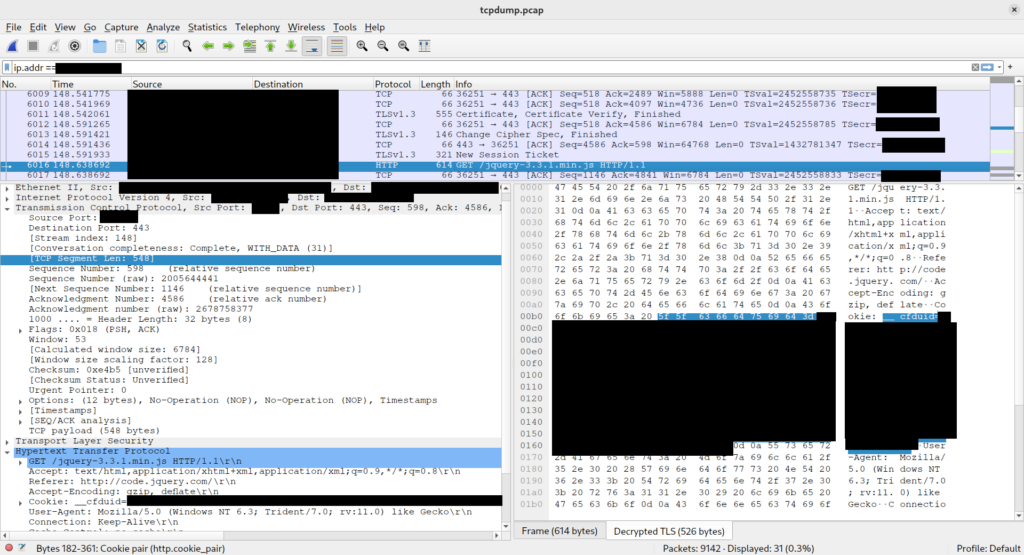
We can now load the PCAP file from tcpdump into Wireshark. Afterwards, we can open the context menu on a TLS packet, select Protocol Preferences, Transport Layer Security and (Pre-)Master-Secret log filename.
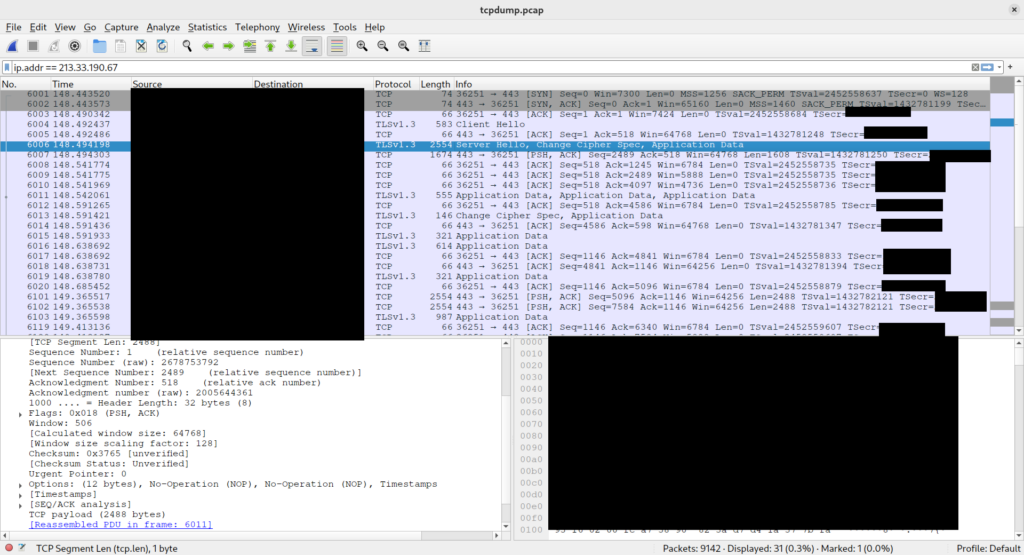
This will open a tiny bar below the filter expression input where we can browse our keys file recorded earlier. Alternatively, we could navigate to Edit, Preferences, Protocols and TLS, and there select the same input field as before. Also, make sure to have Reassemble out-of-order segments enabled in the TCP settings as per the documentation:
The following TCP protocol preferences are also required to enable TLS decryption:
- Allow subdissector to reassemble TCP streams. Enabled by default.
- Reassemble out-of-order segments (since Wireshark 3.0, disabled by default).
This allows us to decrypt the HTTPS traffic and view it!
A Simpler Way
While this was a nice learning opportunity, RedWarden itself offers to dump HTTP traffic through the config.yaml:
# Print debugging output that includes HTTP request/response trace. Default: False
debug: False
Afterwards we can see the same request in the log file:
[DEBUG] 2023-04-19/10:01:00: Logging stats for peer 98.76.54.32:
  elapsed: 0, count: 1
[INFO] 2023-04-19/10:01:00: [REQUEST] GET /jquery-3.3.1.min.js
[TRACE] 2023-04-19/10:01:00: ==== REQUEST ====
GET /jquery-3.3.1.min.js HTTP/1.1
Accept:
  text/html,application/xhtml+xml,application/xml;q=0.9,*/*;q=0.8
Referer: http://code.jquery.com/
Accept-Encoding: gzip, deflate
Cookie: __cfduid=Th3C00k1e...
User-Agent: Mozilla/5.0 (Windows NT 6.3; Trident/7.0; rv:11.0) like Gecko
Connection: Keep-Alive
Cache-Control: no-cache
Host: Host: www.redwarden.example.org
But at least we now know how to decrypt HTTPS in Wireshark and we know that the RedWarden log isn’t incomplete.
But Where Is the IP?
What may still be a source of confusion is the troublesome IP—it doesn’t seem to be part of the communication with RedWarden and CobaltStrike. Indeed, that is showing that our setup, for all intents and purposes, is working! The goal of RedWarden is to „hide“ our server from the outside world: it should deny all requests coming from systems that aren’t our beacons. Meanwhile, part of CobaltStrike’s features is to obfuscate the traffic sent to our team server in order to evade anti virus scans, etc.
The second is what’s tripping us up here: We use a customized version of ThreatExpress‘ Malleable C2 Profile. Their documentation describes a simple HTTP GET profile:
http-get {
    [...]
    client {
        [...]

        metadata {
            base64;
            netbios;
            prepend "cf=";
            header "Cookie";
        }
    }
}
They describe the metadata section as:
The metadata section specifies where things such as cookies can be set, this is an additional place where data can be hidden on C2 communications, typically data is sent in either a specific header or a cookie value which can be specified and set to anything. When red teaming a client it is often common practice to profile users‘ browsers and expected traffic in an environment to enable better blending in. When CS’s Beacon „phones home“ it sends metadata about itself to the CS teamserver.
Further,
There are a few options available when it comes to data encoding and transformation. For example, you may choose to netbios encode the data to transmit, prepend some information, and then base64 encode the whole package.
- base64 – Base64 encode data that is encapsulated in various sections, in the exable above the cookie value
cf_contains encoded metadata to be sent back to the CS server.- base64url – URL-safe Base64 Encode, this is typically used when sending data back in a URL parameter and the data needs to be URL safe so as to not break the communcation stream.
- mask – XOR mask with random key, this encodes and encrypts the data within a XOR stream with a random key, typically used in combination with other encoding to obfuscate the data stream.
- netbios – NetBIOS Encode ‚a‘ it encodes as netbios data in lower case.
- netbiosu – NetBIOS Encode ‚A‘, another form of netbios encoding.
To recap, the above section tasks CobaltStrike beacons to
- Encode their metadata in Base64,
- then encode it as NetBIOS data,
- finally prepend the string
cf=to it and add it asCookieheader.
The newer profiles—which our configuration is based on—use the following config instead:
metadata {
    base64url;
    prepend "__cfduid=";
    header "Cookie";
}
This uses an URL-safe modification of the Base64 encoding and uses the __cfduid cookie instead of cf_. Both are/were used by CloudFlare and usually on an allow-list by anti virus software, thus good candidates for channeling metadata.
We can now decode using e.g., GNU/coreutils‘ baseenc:
$ basenc --decode --base64url Th3C00k1e...
[binary output]
Not so fast! Base64 is no encryption but only a useful encoding for binary data in ASCII based communications. CobaltStrike encrypts any data before being post-processed through some profile with symmetric AES keys. They are stored as Java serialized objects in a file called .cobaltstrike.beacon_keys. We can now use a tool introduced by Didier Stevens in Cobalt Strike: Using Known Private Keys To Decrypt Traffic – Part 2, called cs-decrypt-metadata.py to decrypt the beacon registration message:
$ python ./cs-decrypt-metadata.py \
  -f path/to/.cobaltstrike.beacon_keys \
  Th3C00k1e...
Encrypted metadata: Th3C00k1e...
Decrypted:
Header: 0000beef
Datasize: 00000054
Raw key:  abcdef01234567891n33dc0ffeaaaaaa
 aeskey:  a0b0c0t0d0s0.orgde4dbeefcafed00d
 hmackey: 0ff1ce59ace15600dfeedd0g01234567
charset: 04e4 ANSI Latin 1; Western European (Windows)
charset_oem: 01b5 OEM United States
bid: 38d26566 953312614
pid: 1ab8 6840
port: 0
flags: 0c
var1: 54
var2: 46
var3: 12553
var4: 987654321
var5: 876543210
var6: 841888305
var7: 1497574779
Field: b'PC-WORKSTATION'
Field: b'jane.doe'
Field: b'beacon.exe'
But where’s the IP? Easy, it’s var7 if you squint hard enough. While the tool prints this 4 Byte value as a single integer in decimal representatio, these are actually the bytes forming an IPv4 address in it’s dotted-decimal form in little-endian. If we represent each part of the IP using hex and also print var7 as hex, it’s much easier to spot:
$ printf '%x\n%x.%x.%x.%x\n' 1497574779 123 45 67 89
59432d7b
7b.2d.43.59
Now switch the byte-order and you’re done.
Indeed, someone already documented the fields used in more detail, confirming our theory.
Mystery Solved!
That explains The Unknown IP Mystery and why CobaltStrike shows an IP that doesn’t seem to match with the connections: The IP displayed in CobaltStrike is the „victim’s“ IP, otherwise it would be always the same for our purposes (our RedWarden server). However, this victim IP doesn’t need to match with the connection to our RedWarden either, since the package may be replayed or behind some NAT etc.
Of course it is insufficient to simply block a given IP for long-term effect. The given profile should be changed, and it may be useful to drop packages by default and only allow certain IP ranges explicitly during engagements.
Janis König, B. Sc.
IT-Security Consultant / Penetration Testing